Okay, I guess I've put this off for about as long as I can... The hat. I'll warn you now- this will be a lame tutorial full of my own irritation. Also, this tutorial is for personal use ONLY. Please don't rip me off.
When I made my daughter a cape coat (See post here) I also decided I wanted to make a matching hat-like accessory to go with it. So, I began by tinkering around with not a lot of direction in mind, and this was the final product:

It could have been worse, I suppose. I'm really not happy with this, but I think other people might think it's cute, so I'll post a tutorial in case someone wants to try it out. Who knows? Maybe someone will find some awesome ways to tweak this and make it fab!! So let's dive right in, shall we?
Materials (What I used- Feel free to make substitutions!):
- Crushed Velvet
- Batting
- Tulle
- Felt
- 1 1/2" Satin-Trim Sheer Wired Ribbon
- 7/8" Double-Face Satin Ribbon
- 5/8" Velvet Ribbon
- Lighter
- Measuring Tape
- Tracing Object
- Tracing Pencil
- Scissors
- Straight Pins
- Thread
- Straight Needle
- Curved Needle
- Hot Glue
- Clips
Instructions:
***Important Note: Before we begin, please note that I made each individual section of the hat first, then attached them all together at the very end. You do not have to do this. It is just the way I chose to do everything so that I could visually see what I was doing BEFORE committing the pieces together by gluing or stitching.
1.) Take a piece of fabric (I used crushed velvet) and cut out a circle in the desired size. Be certain your circle is large enough to account for the material that will be folded around the batting.

2.) Choose a circular object to trace that is the size you desire the hat center to be. When compared to your circle of fabric cut in the step above, it should be small enough to allow for fold-over.

3.) Use this circular object to trace a circle onto a piece of quilt batting. I used 2 pieces, to give my center a little more depth.

4.) Place the pieces of batting onto the fabric circle. If using a fabric with a definite top side (my crushed velvet is an example of this), place the batting in the center of the back side. Use pins to fold the excess fabric down around the batting, then set the center circle aside.

Top View after fabric is pinned:

5.) Stitch the veil portion: With what I used, my veil ribbon measured 22 1/2" when I cut it. Depending on the size of your circle, your ribbon length may vary. I "measured" out how much ribbon I'd use by taking the ribbon (still on the spool) and laying it loosely around the circle I'd just made. When I determined I had enough length to ruffle and still go all the way around the circle, I cut.

To stitch, use a straight needle and matching thread, and begin making very large, loose basting stitches in the satin of one edge. Continue this for the entire length of the ribbon.


When the end of the ribbon is reached, gently tug at the thread to pull the ribbon into a loose ruffle. Adjust the tension of the stitches to make the ribbon fit snugly around the center circle piece.

When you are satisfied with the size of the ruffle, use the same needle and thread to stitch the two ends of the ribbon shut, then set the ribbon veil aside.


6.) Stitch the tulle portion: My piece of tulle measured 6 ft in length, and 6" in width. To begin, I folded my piece of tulle in half lengthwise to create a double layer of 3" wide tulle. Then, using the same needle and thread from above, I began loose basting stitches in the folded edge that continued for the length of the tulle.

In the same manner as above, pull the stitches as tightly as you need them to be to create the size ruffle circle you desire. I used my ribbon veil and center circle as a guide for the size I desired. When I was pleased with the size, I stitched the two ends of the tulle together just at the folded edge where my stitches were to close off the circle. Set this piece aside.


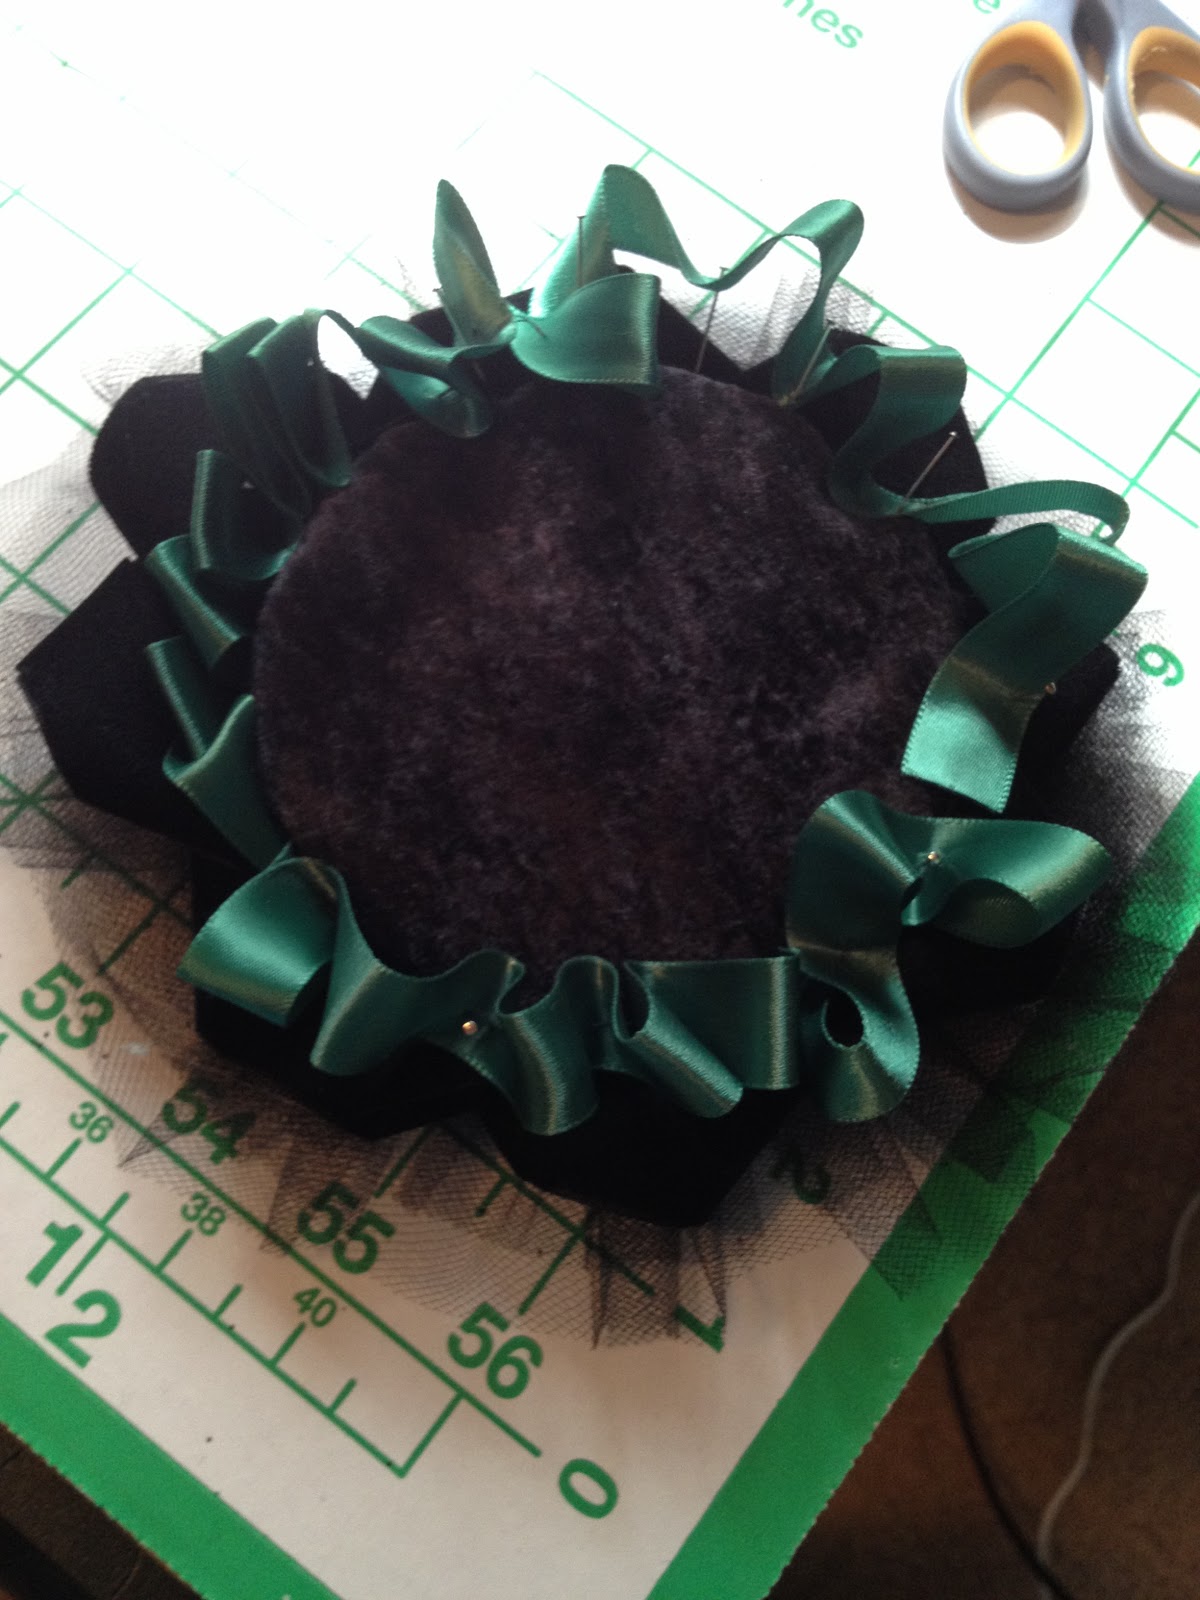
7.) Create the ribbon loops: I used four 14" lengths of velvet ribbon for my loops, but yours may vary. Cut the pieces, then heat-seal the edges using a lighter.
Fold one length in half, and push a straight pin through the center of the fold. The head of the pin should be against the top side of your ribbon. Allow the ribbon to unfold and the sharp end to point upwards.


Using the same steps as above, place the other lengths of ribbon onto the pin.


Spread the lengths of ribbon out, making a type of starburst shape around the pin. Try to keep the space between each end even as you spread.


Moving in one direction around the starburst (I moved counter-clockwise, I think), take each ribbon edge and fold it onto the pin in the center. Make certain to fold the ribbon the same way each time and stay moving in one direction. This keeps the loops the same.


Using your straight needle and thread, push through the center (where the pin currently is) and make several stitches through the ribbon to sew the center together. It may be difficult to push through the thickness of the center with the needle- be careful, and use a thimble or hard surface to push the needle if you need to! Otherwise, you'll be dumb like me and end up bleeding. Honestly, I can't think of very many of my projects that end with me NOT bleeding or burned, but I digress...
After your ribbon loop piece is stitched shut, you can compare the size to the center circle and make sure it is accurate.


8.) Stitch the folded ribbon portion: This was the most exasperating step for me. I don't have a measurement for how much ribbon I used- I just sort of rough-guessed how much I'd need by sort of folding up the ribbon still on the spool and laying it around the center circle to take a stab at how much I'd need. Then I heat sealed the ribbon's edges.
Use the straight needle and thread and stitch through one side of the caterpillar-like folds you'll be making in this ribbon. Make the folds as long as you'd like them to be. Mine were about an inch, I think. Really, I didn't measure much here. Just grumbled and swore. A lot.

When you're done, It will kind of look like this:

8.) Make the decorative bow: I used 37 1/2" for the bow, and 12" for the center knot piece.

Criss-cross your ribbon to make a bow-like shape.

Pinch the middle together, then use thread to wind around this portion to hold it in this shape.


With the length of ribbon designated for the center knot, make a loop in the size you want, pinching where the pieces intersect, then wind thread around this part too.


Place the center knot on top of the bow, then use the ends of the center knot to secure the knot to the bow by tying an actual knot then trim the excess.

Trim the excess to make the sides even, and carefully heat-seal the edges with a lighter.

9.) Using your tracing object, cut out a circle of felt. This will be the "base" of the hat, where you'll attach the clips.

10.) Finally! It's time for hot glue!!!
Glue the tulle ruffle circle on top of the felt and gently press down. Here's where I get burned- remember that the glue will seep up through the tulle...

Glue the ribbon loop on top of the tulle. Do not glue all the way out to the edges- you'll want the loops to be able to stand up around the other ribbon and center circle.

Glue the edges of the fabric on the center circle down to the batting, trying to keep the circular edge smooth.
Glue the center circle to the ribbon loop. Leave a little space unglued all around the edges of the center circle to tuck the caterpillar-fold ribbon underneath.

And let the torture begin... I found it easier to loosely pin the folds all around the center circle just so I had rough guidelines of how to glue. Begin gluing each fold under the edge of the center circle. This ribbon circle will become wedged between the ribbon loop and the center circle.

Glue the decorative bow to the center circle.

10.) Flip the hat over. Using the curved needle (I'm sure a straight one would have worked too, but since I was making loop stitches all the way around it was easier for me to use a small curved needle.), stitch the ribbon veil to the felt circle.

11.) Glue clips to the felt circle (or stitch them, if you'd prefer). I used two clips on mine, to keep it from wobbling so much.
12.) Turn back over and re-fluff the bow. Voila! You are done!


And there you have it! Please feel free to ask questions if you have them, but be prepared for kind of vague answers. I really just sort of winged it.
'Til Later!!!
----- D
Very creative! She's adorable!
ReplyDeleteHaha! Thanks Molly!!!
ReplyDelete